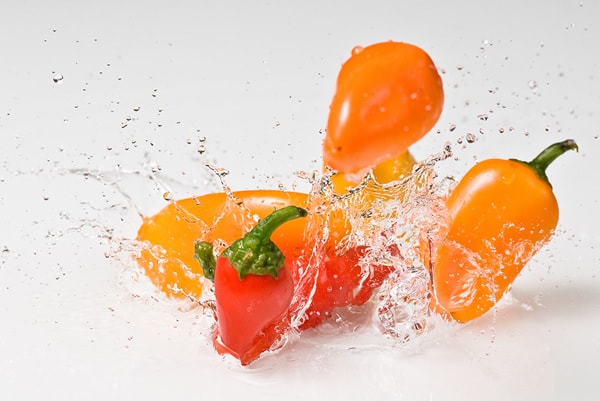
An Introduction To Splash Water Photography
Water splash photography is one the coolest and most elegant types of photography. And it’s not as difficult as you may think. The process is actually quite simple, you just need the right equipment and a little practice to create a simple yet perfect water splash photo.

Taking a photo of a water splash is quite a fun little project, and it will definitely improve your photography skills.
Here’s what you’ll need:
- High quality camera
- Camera timer (built-in is fine)
- Glass of water
- Item to drop in the water (fruit, rock, more Water)
- External flash
- Black backdrop/surface
- Light reflectors (aluminum foils works great)
- Dark Location
- Tripod (optional, recommended)
- Towel (optional, recommended)
- Photoshop or Other Editing Software (Optional but highly recommended)
The Setup
The setup is probably the most important part in taking a water splash photo. The first thing to do is get your backdrop and surface ready. Once you found your surface make sure the backdrop right behind it. Setup up your camera. What you want to do at this point is make sure all the camera sees is black (don’t forget to take your lens cap off).
While getting the black backdrop and surface ready, make sure that you still have the room for the camera to be able to see a glass and water splashes. Place the almighty glass o’ water into the setting, make sure every part is visible.
Get your external flash and reflector ready. You want the flash to be facing the side of the glass, not toward the camera nor the back drop. Then place the reflector on the other side. This allows great light, one side will have more focused light while the other has a medium light, this creates a great effect and is visible on both the glass and water. Make sure you have the item that you want to drop ready. For camera placement, you don’t want the camera to be too close but not to far either. Make sure that you get the image but no water into your lens.
Moving onto the camera setup/settings. To begin use an aperture any where form f/4 to f/8. I found that f/5.6 works great. You don’t want the image to be too bright nor too dark. As for shutter speed use 1/125s, it works great for a water splash. 1/250s worked great as well, this is something to experiment on. The ISO should be a low/medium ISO setting. Something like 300 ISO would do fine. You want the flash and reflector to do their jobs, if the settings on the camera do not allow that, you could end up with a blurry photo. Don’t forget to use a RAW image over a JPEG.
It won’t really make much of a difference if you use JPEG. If you are editing this in Photoshop I would highly recommend that you use a RAW image. Auto-focus works great for this, just make sure you have focus via Auto-focus before you do anything. If you prefer Manual focus for everything, that is fine, as they both work great. Finally, get a timer on your camera ready. This is important because you need to work very efficiently and won’t have the time to press the capture button. I would use anywhere from 5-10 seconds.
Taking the Photo
This is where patience comes in handy. Once the timer is initiated and the item is in your hand, get ready to drop the item. You want to make sure that there are one to two seconds left till the photo will be taken, when that happens drop your item. Timing is key. You turn on the flash as soon as there is a splash/when the picture is captured it brings a better effect rather than if you leave the flash on the whole time. Leaving the external flash on the whole time will also create a nice effect and it takes less time, but it is not as good as of an effect and turning it on as soon as the splash is initiated.
Taking the photo is a process that is filled with trial and error, as I said timing is key. Make sure that you don’t drop it from a location that is too high, it will create a huge splash that the camera may not capture, along with that, it can create a mess. Keep on doing this until you get the perfect photo, after a little practice this can be done with quickly and easily.
Photoshop
This is an optional step, but highly, highly recommended. Once you have your not-yet perfect photo, open it in Photoshop. The first thing you want to do is check if there is a reflection of the glass or splash on the picture, you can add or remove one depending on your liking. Onto more important matters. Create two new duplicate layers, you should have three layers in total. Change the layer mode of the second layer to overlay and lower the opacity to around 60% percent.
As for the third layer first, lower the contrast. Mess around with the contrast, see what works best with the photo. Create a layer mask to the third layer. Now using the paintbrush tool (white, feathered at 10%) fill in the bottom 1/4 of the image. Duplicate the third layer and lower the opacity to 60%.
You now have an amazing looking photo, we still have some final touch-ups to do. The photo should have some tiny drop lets of water on the sides you want to remove some of them, only a few, and only the ones on the sides. To do this first, merge visible. Then use the same brush used before, and change the color to black. You probably will also need to scale the brush to a different size, the size should be relatively small. Begin removing the tiny droplets, only a few and only unwanted ones. If you like the effect with the little droplets, keep em’ you can also add more.
Adding more is a very simple task, To add more droplets use the square select tool and select a droplet, now copy and paste them. Every time you paste it, rotate it and scale it so that the photo won’t look weird. Don’t add too many, it looks better with just a few. You should be done now. In result of your hard work you get an elegant, cool looking, perfect splash photo. With a little practice, you can master this in no-time.